
Tile & Grout Refresh: DIY or Handyman Services in Upstate NY
Tile and grout make or break the feel of a bathroom, kitchen, or entryway. For first-time homeowners in Albany, Latham, Saratoga, and across Upstate NY, keeping grout clean and caulk intact is about more than how things look—it protects your home from moisture, mold, and premature wear. A timely refresh can extend the life of your tile and preserve your home’s value.
This guide breaks down which tasks you can confidently tackle yourself—like regrouting small areas, recaulking around a tub, or fixing a minor chip—and when it’s safer and more cost-effective to call a pro. If you decide expert help is the smarter move, A&S Home Services can provide local guidance and skilled support you can trust.
Let’s help you choose the right path for your project, avoid unnecessary costs, and protect your home the smart way.
Why a Tile & Grout Refresh Matters in Upstate NY
In our region, freeze–thaw cycles, hard water, and seasonal humidity put extra stress on tile assemblies. A clean, sealed grout line and fresh, flexible caulk bead ensure that everyday water stays where it belongs—on the surface.
- Cleanliness and health: Reduces mold, mildew, and odors in bathrooms and kitchens.
- Durability: Protects substrates, backer board, and framing from moisture and rot.
- Energy and comfort: Well-sealed wet areas help keep humidity under control.
- Resale appeal: Fresh grout and caulk can make older tile look newer, boosting buyer confidence.
handyman services vs. DIY: Quick Decision Guide
Use this at-a-glance matrix to decide your next move.
| Situation | DIY-Friendly? | Go Pro? | Why |
|---|---|---|---|
| Hairline grout cracks covering < 10 sq. ft. | Yes | No | Localized regrout is manageable with basic tools. |
| Missing or moldy caulk along a tub or backsplash | Yes | No | Recaulking is a straightforward weekend job. |
| Loose or hollow-sounding tiles; failing substrate | No | Yes | Underlying movement issues require expert diagnosis. |
| Cracked tiles from impact, 1–3 tiles total | Maybe | Maybe | DIY possible if replacement tiles are available and substrate is sound. |
| Showers with persistent leaks or recurring mold | No | Yes | Likely a waterproofing issue behind the tile. |
| Historic or high-end tile where appearance matters | Maybe | Yes | Pros ensure color-matched grout/caulk and clean lines. |
When to Regrout Yourself
Regrouting restores the lines between tiles, improving both appearance and moisture protection. DIY regrouting is reasonable when the tiled area is small (under 10–20 sq. ft.), damage is superficial, and the tiles are firmly bonded.
Good DIY candidates
- Hairline cracks or powdery grout that brushes away in a small section.
- Grout stains that won’t lift with a pH-neutral cleaner and soft brush.
- Grout joints that were never sealed and are absorbing water in isolated areas.
How to regrout a small area (step-by-step)
- Assess the grout type: Cementitious grout is common and DIY-friendly. Epoxy grout is harder to remove and best left to pros.
- Protect the area: Tape off edges; cover tub or countertops with rosin paper.
- Remove damaged grout: Use a grout saw or oscillating tool with a grout-removal blade. Keep the blade centered to avoid chipping tile edges.
- Vacuum and rinse: Remove dust with a shop vac and damp sponge; let dry fully.
- Mix new grout: Follow the package; aim for peanut-butter consistency.
- Pack and shape: Use a rubber float at 45 degrees. Press grout into joints; swipe diagonally to remove excess.
- Initial clean: After a light haze forms, wipe with a barely damp sponge. Rinse frequently; avoid flooding the joints.
- Final polish: Once fully dry, buff with a microfiber cloth to remove haze.
- Seal: After cure time (often 48–72 hours for cement grout), apply a penetrating sealer in two thin coats.
When regrouting is not enough
- Grout cracks keep returning—possible movement or substrate issues.
- Grout is damp or discolored days after showers—potential leak.
- Tiles sound hollow or feel loose—bond failure under the tile.
In these cases, calling professional handyman services can prevent larger water-damage repairs.
When to Recaulk Yourself
Caulk bridges changes in plane—where the tub meets the wall, or where the countertop meets the backsplash. It’s flexible and designed to move, unlike grout.
Good DIY candidates
- Yellowed, moldy, or peeling caulk along tubs, showers, sinks, or counters.
- Gaps smaller than 1/4 inch in otherwise solid, clean joints.
- Non-structural seams where surfaces meet (not between tiles on a flat wall).
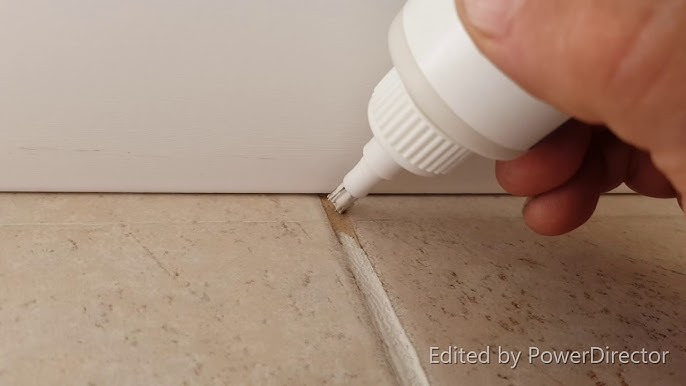
Simple steps for recaulking
- Remove old caulk: Use a caulk remover gel and plastic scraper; avoid metal blades that can scratch tubs or tile.
- Clean and dry: Wipe with isopropyl alcohol. Let the area dry completely (overnight is best).
- Tape your lines: Painter’s tape makes crisp edges and prevents over-application.
- Apply caulk: Use 100% silicone for wet areas; kitchen and bath formulas resist mold and mildew. Cut the nozzle small and steady the bead.
- Tool the bead: Smooth with a damp finger or caulk tool within 5–10 minutes.
- Cure: Avoid water contact for at least 24 hours, per manufacturer.
Caulk vs. grout (know the difference)
| Feature | Caulk | Grout |
|---|---|---|
| Purpose | Seals joints where surfaces meet; flexes with movement | Fills spaces between tiles; rigid |
| Typical locations | Tub-to-wall, counter-to-backsplash, shower corners | Between tiles on floors, walls, and backsplashes |
| Best material | 100% silicone for wet zones | Cementitious or epoxy, depending on use |
| DIY difficulty | Low | Moderate |
While you’re working around fixtures, it’s also a great time to review water-saving and leak-prevention tips. See these practical plumbing tips from a Latham, NY handyman to keep your wet areas running smoothly.
Minor Tile Repair: Chips, Cracks, and Pop-Outs
Small tile issues can usually be handled in an afternoon, provided you have a few extra tiles and matching grout.
DIY-friendly repairs
- Chip repair: Use a color-matched epoxy or tile repair kit to fill chips. Sand lightly and seal if needed.
- Hairline cracks: If the tile is stable and the crack is purely cosmetic, fill with clear epoxy and color the repair with porcelain touch-up paint.
- Single-tile replacement: Heat and soften the thinset with a heat gun, then carefully chisel out the broken tile. Replace with a matching tile and fresh thinset; regrout once cured.
When a pro should step in
- Multiple adjacent tiles are loose or tented (raised off the floor).
- You see staining or softness in the wallboard under shower tile.
- Under-tile radiant heat is present—avoid damaging heating elements.
These repairs can expose deeper issues in the substrate or waterproofing, where experienced handyman services are the safer choice.
Tools and Materials Checklist for Common Grout & Caulk Jobs
Having the right tools prevents damage and speeds up the job.
| Tool/Material | Use | Notes |
|---|---|---|
| Grout saw or oscillating tool with grout blade | Remove old grout | Keep steady to avoid chipping tile edges. |
| Rubber grout float | Pack new grout into joints | Works best at a 45-degree angle. |
| Microfiber cloths and non-abrasive sponges | Clean haze and polish | Avoid rough pads that scratch glaze. |
| Penetrating grout sealer | Protects grout from stains and moisture | Reapply every 12–24 months in wet areas. |
| 100% silicone caulk (kitchen/bath rated) | Seal tub, shower, sink joints | Choose a color to match grout or tile. |
| Painter’s tape | Mask clean caulk lines | Remove before skin forms on caulk. |
| Utility knife and plastic scraper | Remove old caulk and residue | Avoid metal scrapers on acrylic tubs. |
| Shop vacuum and PPE | Dust control and safety | Use eye protection and a mask. |
Risks of DIY in Wet Areas (And How to Avoid Them)
Tile and grout work looks simple, but mistakes can be costly—especially in bathrooms and laundry rooms where water is constant.
- Water intrusion: Incomplete grout removal can trap moisture behind tiles, leading to rot.
- Improper sealing: Skipping sealer or using the wrong type allows staining and mold growth.
- Wrong material: Acrylic or latex caulk in a shower fails fast; use 100% silicone.
- Over-wetting grout: Excess water when cleaning can weaken grout and cause powdering.
- Cold-weather curing: In unconditioned spaces, low temperatures slow curing times and weaken bonds.
Rule of thumb: In constantly wet zones (showers) or where leaks would be expensive (a second-floor bath over finished space), consider professional handyman services to ensure proper prep and waterproofing.
Signs It’s Time to Bring In Professional Handyman Services
If you notice any of the following, it may be more cost-effective to hire handyman services before damage spreads:
- Persistent grout discoloration or dampness days after use.
- Soft drywall, mushy backer board, or musty odors behind tile.
- Multiple loose tiles or hollow sounds across a section of floor or wall.
- Recurrent caulk failure within months of replacement.
- Visible cracks in shower pans or at thresholds.
- Underfloor stains on ceilings below bathrooms.
Pros can perform moisture checks, confirm substrate stability, and ensure waterproofing layers are intact—saving you from repeated patch jobs.
Cost Comparison: DIY Tile Refresh vs Pro Care
Here’s a realistic range for Upstate NY. Prices vary by tile type, area size, and site conditions.
| Project | DIY Materials | Typical Pro Cost | Notes |
|---|---|---|---|
| Regrout (small area, up to 20 sq. ft.) | $30–$80 (grout, float, sealer) | $200–$450 | Complex patterns and epoxy grout cost more. |
| Full shower regrout | $60–$120 | $600–$1,200 | Includes removal, regrout, and sealing. |
| Recaulk tub/shower | $10–$25 | $150–$300 | Higher if mold remediation is required. |
| Replace 1–3 floor tiles | $20–$60 | $200–$500 | Assumes you have matching tiles on hand. |
| Investigate and repair leak behind tile | $50–$200 | $350–$1,500+ | Scope varies; may require substrate repairs. |
DIY saves money on straightforward jobs, but leaks and recurring failures can quickly outweigh savings. If you’re unsure about waterproofing, hiring handyman services can be a smart investment.
How Expert Help Protects Long-Term Home Value
Well-executed tile work does more than look good. It prevents moisture from migrating into walls and floors, which can lead to hidden structural damage and expensive remediation. The difference shows up at appraisal and inspection time, too: clean grout lines, crisp caulk beads, and a dry subfloor build buyer trust.
- Pro-grade prep: Ensures backer board integrity, proper thinset coverage, and correct movement joints.
- Material matching: Color-consistent grout and caulk, professional-grade sealers.
- Warranty and accountability: A credible pro stands behind the work.
Looking to build equity beyond the bathroom or kitchen? Explore other home service projects that will add value and enhance curb appeal and functionality across your property.
Trends in Tile & Restoration Projects Around Albany and Upstate NY
- Large-format porcelain: Fewer grout lines mean easier upkeep—great for family baths and mudrooms.
- Matte and textured finishes: Better slip resistance, especially for entries during snowy months.
- Warm neutrals and earthy tones: Taupe and greige grouts hide everyday dirt between deep cleans.
- Epoxy grout in wet zones: Higher upfront cost, lower maintenance; popular in busy households.
- Heated floors with tile: Radiant heat adds comfort but requires careful tile setting—best handled by experienced installers.
- Color-matched silicone caulks: Cleaner transitions and longer life in showers and around tubs.
DIY Maintenance Schedule (Simple Planner)
| Task | Frequency | Tip |
|---|---|---|
| Light cleaning with pH-neutral cleaner | Weekly | Avoid acidic cleaners—they erode cement grout. |
| Inspect caulk and corners | Monthly | Look for gaps, discoloration, or peeling. |
| Deep clean grout | Quarterly | Use a soft brush; avoid metal bristles. |
| Reseal grout (cementitious) | 12–24 months | More often in high-use showers. |
| Recaulk high-use joints | 12–18 months | Silicone lasts longer; inspect during seasonal changes. |
FAQ: Tile & Grout Care for First-Time Homeowners
How do I know if I have cement or epoxy grout?
Cement grout is porous, can powder when rubbed, and typically absorbs a bit of water. Epoxy grout is very hard, chemical-resistant, and often slightly shiny; it won’t absorb water. If removal is difficult with a hand grout saw, you may have epoxy.
Can I grout over old grout?
Only if the old grout is sound and you remove enough depth for the new grout to bond (at least half the joint depth). Otherwise, the new layer can flake off. When in doubt, remove more of the old material.
Do I need to seal grout in a shower?
Yes, if it’s cementitious. Sealing helps reduce staining and moisture absorption. Epoxy grout usually doesn’t need sealing, though the surrounding stone or porous tile might.
What’s the best caulk for a shower?
100% silicone labeled for kitchen and bath. It’s mold- and mildew-resistant and remains flexible. Avoid painter’s caulk or latex blends in constantly wet areas.
Why does my grout keep cracking?
Common causes include substrate movement, inadequate thinset coverage, or missing movement joints at perimeters or changes of plane. Regrouting alone won’t fix structural movement.
Can I replace a single broken tile?
Yes, if you have a matching tile and the substrate is sound. Remove grout around the tile, carefully chisel it out, clean the thinset, set the new tile, and regrout once cured. If adjacent tiles are loose, call professional handyman services to check the base.
Is bleach safe for grout?
Occasional diluted bleach can disinfect, but frequent use may degrade cement grout and harm surrounding finishes. A pH-neutral cleaner is safer for routine cleaning.
How can I prevent mold in my bathroom?
Run an exhaust fan during and at least 20 minutes after showers, keep relative humidity near 40–50%, squeegee walls after use, and maintain intact caulk and sealed grout.
Decision Checklist: DIY or Hire?
- Scope: Is the area small (under 20 sq. ft.) and localized?
- Condition: Are tiles solid with no hollow sounds or movement?
- Moisture: Any signs of leaks, dampness, or musty smells?
- Confidence: Do you have the tools and time to do it right?
- Cost of failure: Would a mistake risk hidden water damage?
If you can answer yes to the first two and no to moisture concerns, DIY can be a win. Otherwise, professional handyman services can be the safer, more economical choice in the long run.
Local Considerations in Upstate NY Homes
- Hard water: Mineral deposits can discolor grout and caulk. Use gentle descalers and rinse thoroughly.
- Seasonal humidity: Expansion and contraction can stress joints; choose flexible silicones for corners.
- Cold rooms: In basements and entryways, low temps slow curing—follow manufacturer cure times.
- Older homes: Plaster, lathe, and mixed substrates benefit from pro evaluation before tile repairs.
Conclusion: Refresh Smart, Protect Your Investment
A well-timed tile and grout refresh does more than brighten your bathroom or kitchen. It safeguards your walls and floors, reduces mold, and supports your home’s value—especially important for first-time homeowners learning the ropes. Small jobs like recaulking and spot regrouting are perfect DIY projects. For leaks, loose tiles, or recurring failures, bringing in reliable handyman services can save time, stress, and costly repairs.
If you’d like local, trusted help in Albany and Upstate NY, A&S Home Services can assess your project, provide clear options, and deliver results that last.