
Crack Filling Near Me: Upstate NY Driveway Sealing Guide
Your driveway takes a beating in Upstate NY. Freeze-thaw cycles, road salt, and snow removal strain asphalt and concrete. Small cracks widen, water gets in, and potholes form. With the right plan, you can stop damage early and extend pavement life by years with crack filling near me.
This Q and A guide answers the most common homeowner questions about driveway crack sealing in our climate. You will learn when to seal, when to resurface, how much it costs, and how to choose a local pro. If you prefer to hire help, A&S Home Services can handle prep, sealing, and follow-up so you do not have to.
Q: Why does sealing driveway cracks matter in Upstate NY?
A: It protects structure, value, and safety.
- Water control: Sealed cracks block water from entering the base. That prevents freeze expansion that pries asphalt apart.
- Life extension: Routine crack sealing can add 3 to 5 years to an asphalt driveway that is otherwise in fair condition.
- Safety: Filled cracks stop trip hazards and reduce tire catches for bikes, strollers, and snowblowers.
- Salt resistance: Sealed surfaces resist chloride and moisture penetration from winter salt.
- Curb appeal: Clean joints and smooth edges look cared for and help resale confidence.
A: What does the local climate do to my driveway?
- Freeze-thaw cycles: Many Upstate counties see 40 to 70 freeze-thaw days per year.
- Snow: Seasonal snowfall often exceeds 70 inches, with lake-effect zones seeing much more. Meltwater migrates into cracks.
- Plowing and scraping: Steel edges chip raveling areas and widen unsealed joints.
- Spring saturation: High spring runoff loads the base with water if cracks are open.
Q: Which cracks need sealing and which need resurfacing?
A: Identify crack type and severity before you choose a fix.
Use this table to decide on sealing, patching, overlay, or replacement. Measurements reflect typical thresholds in residential driveways.
| Crack Type | Typical Width | Common Cause | Action | Notes |
|---|---|---|---|---|
| Hairline linear | < 1/8 inch | Thermal movement | Seal with liquid crack filler | Clean with blower and wire brush first |
| Transverse or longitudinal | 1/8 to 1/2 inch | Contraction or joint failure | Hot pour or rubberized cold-pour filler | Backer rod if deeper than 1/2 inch |
| Edge cracks | 1/8 to 1/2 inch | Weak shoulders or vegetation | Seal and shore up edge base | Trim grass, add compacted gravel support |
| Block or map cracking | Network of small cracks | Surface oxidation | Seal if shallow. Consider sealcoat or thin overlay | If widespread, sealing alone is temporary |
| Alligator cracking | Interconnected, load-related | Base failure | Cut out and patch or resurface | Do not just fill. Correct base first |
| Heave or settlement cracks | Variable | Frost heave or subgrade movement | Evaluate cause. Patch or replace sections | Check drainage. Consider contractor assessment |
| Potholes | > 2 inches deep | Water infiltration and traffic | Cut, clean, tack, hot mix patch | Cold patch is short-term in winter |
Q: What is the best season to seal cracks in Upstate NY?
A: Late spring through early fall. Aim for dry weather and mild temperatures.
- Temperature: 50 to 80 F is ideal for most rubberized fillers.
- Surface dryness: Wait 24 hours after rain. Avoid sealing within 24 hours before rainfall.
- Spring priority: Fix winter damage before hot weather expands the gaps.
- Fall deadline: Complete sealing at least 30 days before freezing nights become regular.
When should you search for crack filling near me?
A: Trigger events and timing help you act before damage grows.
- After snowmelt: Inspect right after the last freeze-thaw wave. Look for new lines, edge gaps, and early potholes.
- Before sealcoating: Fill cracks 1 to 2 weeks before any sealcoat for proper cure.
- Before listing your home: Freshly filled cracks and clean edges improve first impressions.
- If you see pumping fines: When traffic forces gritty water out of cracks, call a pro. The base is getting saturated.
If you need quick scheduling or you lack tools, it is smart to book a local service. Use your notes and photos when you start a quote request for crack filling near me.
Q: How does Upstate NY climate change the maintenance plan?
A: Plan around freeze-thaw, snow, and salt.
Use this simple climate profile to time your inspections and work windows.
Freeze-Thaw Index by Month (typical pattern)
J  F  M  A  M  J  J  A  S  O  N  D
■■■■■■■■■■■■■■■■■■■■■■  High risk
■■■■■■■■■■■■          Medium
■■■                   Low

Approximate trend: High in Jan-Mar, medium in Apr and Nov-Dec, low in May-Oct.
What this means for you:
- Inspect in early April and mid November.
- Schedule sealing from May to September.
- Keep de-icing salt away from edges where possible. Use sand or calcium magnesium acetate when safe for your surface.
- Shovel promptly. Avoid aggressive plow angles at the driveway edge.
Q: What does DIY crack sealing cost versus hiring a professional?
A: Here is a clear comparison.
| Item | DIY Range | Professional Range | Notes |
|---|---|---|---|
| Materials | $15 to $40 per gallon or tube | Included in linear foot price | Rubberized cold-pour for DIY. Hot pour with crack kettle for pros. |
| Tools | $40 to $200 | Included | Wire brush, blower, scraper, squeegee, torch or heat gun optional |
| Labor | Your time | $1.50 to $4.00 per linear foot | Complex prep and deep cracks cost more |
| Total for 100 linear feet | $50 to $250 | $150 to $400 | Depends on width, depth, and cleaning |
A: Pros and cons of DIY vs hiring
- DIY pros: Lower material cost, flexible timing, good for hairline to 1/4 inch cracks.
- DIY cons: Limited tools, learning curve, weather risk, shorter-lasting seal on wider joints.
- Pro pros: Hot-pour options, routing capability, better adhesion, faster production, warranty potential.
- Pro cons: Scheduling and higher upfront cost.
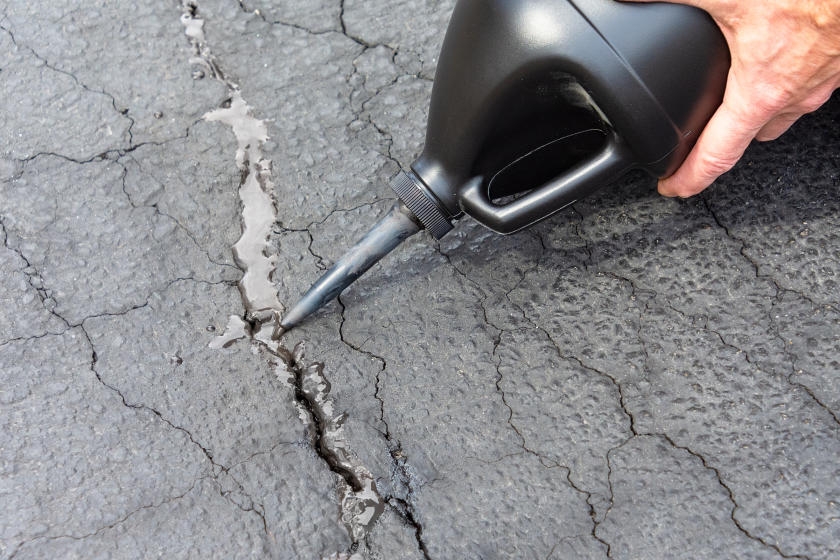
Q: What tools and materials do I need for DIY sealing?

A: Basic kit for asphalt cracks up to 1/2 inch.
- Cleaning: Stiff wire brush, shop vac or leaf blower, scraper, broom.
- Drying: Propane torch or heat gun for damp joints. Use with care.
- Filler: Rubberized crack filler suitable for 1/2 inch max width.
- Backer rod: Closed-cell foam for deep cracks. Fill 3/4 of depth with rod, then seal.
- Applicators: Caulk gun or pourable jug and V-squeegee.
- Protection: Nitrile gloves, safety glasses, knee pads, long sleeves.
A: Simple step-by-step
- Mark the cracks you plan to fill. Prioritize the widest and deepest first.
- Scrape and brush out loose material. Blow out dust and debris.
- Dry the crack fully. Check by pressing a paper towel against the joint.
- Insert backer rod if the crack is deeper than it is wide.
- Apply filler in a steady bead. Slightly overfill.
- Tool the surface with a V-squeegee. Aim for a slight crown.
- Protect from traffic and water until cured. Follow the label for cure time.
- Re-check after 24 hours. Add a second pass if the filler settles.
Q: How do I know if resurfacing or replacement is smarter?
A: Use the 30 percent rule and the base test.
- 30 percent rule: If more than 30 percent of the surface shows block cracking, alligatoring, or raveling, an overlay may be more cost-effective than spot sealing.
- Base test: If you can press a screwdriver into the edge base after rain, the base is soft. Sealing alone will not last. Consider base repair and patching.
- Age: Asphalt older than 18 to 20 years with widespread cracking usually benefits from overlay or replacement.
Q: How often should I sealcoat after crack filling?
A: Every 2 to 3 years for asphalt in Upstate NY, if the surface is in fair condition.
- Always seal cracks first. Let them cure.
- Sealcoat is not a crack filler. It is a surface protectant.
- If the surface has heavy oxidation or minor block cracking, a higher-solids seal may help appearance and water shedding.
Q: What about concrete driveways?
A: Use different materials and manage joints.
- Hairline cracks: Use a concrete crack sealant or low-viscosity polyurethane.
- Control joints: Keep joints clean and filled with a flexible sealant to block water and grit.
- Spalling from salt: Consider a silane-siloxane sealer for water repellency after repairs.
Q: What long-term maintenance keeps cracks from coming back?
A: Build a simple seasonal routine.
| Season | Tasks |
|---|---|
| Spring | Full inspection, clean edges, fill cracks, patch potholes |
| Summer | Spot touch-ups, sealcoat if due, manage vegetation |
| Fall | Second inspection, clean leaves, seal new cracks, improve drainage |
| Winter | Shovel promptly, use lighter de-icers, avoid gouging with plow edges |
Q: What common mistakes reduce crack filler performance?
A: Watch for these issues.
- Filling wet or dirty cracks. Adhesion fails.
- Skipping backer rod in deep joints. Filler sinks and splits.
- Overfilling and leaving a mound. Plow blades catch and tear.
- Applying too cold. Some fillers will not flow or bond under 50 F.
- Skipping edge support. Weak shoulders reopen faster.
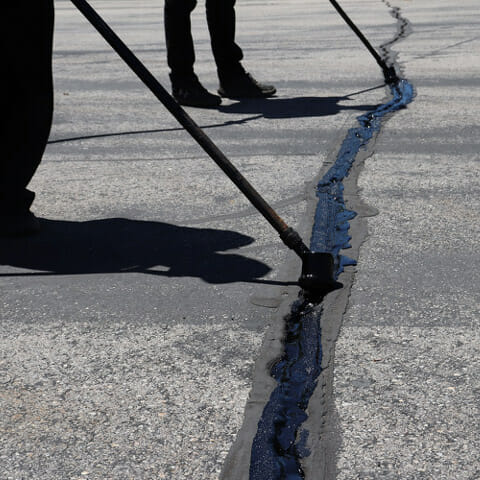
Q: How do I vet local driveway crack sealing services?
A: Use a simple checklist.
- Ask what filler they use. Hot pour for wider cracks and routing options for clean edges are good signs.
- Request linear-foot pricing and minimum charge. Get it in writing.
- Confirm surface prep steps: Cleaning, drying, backer rod where needed, and traffic control.
- Ask for local references within the last 12 months.
- Request proof of insurance and photos of before and after work.
- Check scheduling lead time and cure-time plan around forecast.
If you prefer to research further, you can read more homeowner improvement tips on the company blog.
Q: Can crack sealing improve home value?
A: Yes, by improving visible condition and reducing future repair risk for buyers.
- First impressions matter in showings. A clean, sealed driveway supports your overall maintenance story.
- Buyers factor in needed repairs. Visible deterioration can lead to lower offers.
- Paired with simple exterior upgrades, it can support a stronger list price.
See related ideas for practical upgrades that impact resale on this guide: How can a handyman upgrade my home value.
Q: What are realistic lifespans for driveways with routine crack sealing?
A: A simple benchmark helps you plan.
| Surface Type | Typical Lifespan Without Maintenance | With Routine Crack Sealing | Notes |
|---|---|---|---|
| Asphalt | 12 to 15 years | 15 to 20 years | Assumes sealcoating every 2 to 3 years and timely patches |
| Concrete | 25 to 30 years | 30 to 35 years | Joint maintenance and water management are key |
Q: How do I set a budget for the year?
A: Plan a small annual reserve and a larger reserve for big fixes.
- Annual: $150 to $300 for crack filler, patching materials, and edge gravel for an average driveway.
- Every 2 to 3 years: $200 to $500 for sealcoating depending on size and prep.
- Every 8 to 12 years: $1,500 to $4,000 for surface milling and overlay if needed.
Q: What is a practical homeowner checklist I can follow?
A: Use this checklist each year.
- Walk your driveway in April with a flashlight at low angle to highlight cracks.
- Measure crack widths with a coin. Dime is about 1.35 mm. Quarter is about 1.75 mm. Note widths and lengths.
- Photograph the worst five areas. Track changes every season.
- Clear edges. Trim grass 2 inches back from the asphalt edge.
- Clean catch basins and ensure runoff does not flow under the driveway.
- Buy filler and backer rod before the first warm weekend.
- Seal the widest cracks first. Then hairlines.
- Place cones or sawhorses for cure time.
- Schedule sealcoat if due and forecast is dry.
- Set a calendar reminder for a quick fall inspection in October.
Q: How do local handyman services make crack repairs simple?
A: They bundle inspection, prep, materials, and scheduling into one visit.
- One call: A single point of contact for crack sealing, edging, and minor patching.
- Correct materials: Pros select the right filler for your crack widths and temperatures.
- Proper prep: Dust-free cleaning, drying, and backer rod installation for deeper joints.
- Efficient application: Even beads, correct tooling, and clean lines at the curb.
- Weather timing: Local teams plan around rain and cold snaps to avoid failures.
- Follow-up: A short recheck within a week to touch up any settled joints.
Q: What are signs I should contact a pro right now?
A: Do not wait if you see these.
- Multiple cracks wider than 1/2 inch.
- Alligator cracking or soft spots underfoot.
- Recurrent potholes after cold patching.
- Standing water that does not drain within 24 hours.
- Cracking along the garage apron with movement.
If you are trying to line up quotes before a rain window, a fast way is to search for crack filling near me and compare availability and process notes.
FAQs
Q: How long does crack filler take to cure?
A: Many cold-pour fillers skin over in 1 to 2 hours and cure in 24 to 48 hours. Hot-pour products often set faster but still need protection from traffic until cooled and firm.
Q: Will sealing stop weeds?
A: It reduces weed growth by blocking light and soil. If weeds have taken root, remove them and treat the area before filling.
Q: Can I fill cracks in cold weather?
A: It is not ideal. Most products require 50 F and rising. Emergency winter repairs can be made with specialty materials, but plan a proper repair in spring.
Q: Should I route cracks first?
A: Routing creates a uniform reservoir that can improve adhesion and longevity for larger cracks. It is not necessary for hairlines. Pros often route 1/4 inch or wider cracks.
Q: Does sealcoat fill cracks?
A: No. Sealcoat is a thin surface layer. Always fill cracks first.
Q: How soon can I drive on filled cracks?
A: Check the product label. Many allow light foot traffic in a few hours and vehicle traffic after 24 to 48 hours under warm, dry conditions.
Q: What if filler sinks after curing?
A: Add a second pass after the first cure. Sinking indicates a deep cavity or missing backer rod.
Q: Are there low-odor options?
A: Yes. Many water-based or low-VOC products exist for small residential jobs. They are best for hairlines and moderate widths.
Q: Can I pressure wash before filling?
A: You can, but let the cracks dry fully. Trapped moisture causes poor adhesion.
Q: How do I protect the edges from plows?
A: Keep the outer 12 inches well supported with compacted gravel and avoid setting the blade to scrape directly on the driveway edge.
Summary and next steps
In Upstate NY, the best driveway plan is simple. Inspect after winter, seal cracks quickly, and protect the surface in warm months. Use a clear checklist and budget small yearly amounts to avoid large repairs later. If you want a fast, dependable service appointment and a clean result, contact A&S Home Services for help with inspection, prep, and sealing.