
Siding & Exterior Trim Repair in Schenectady & Albany: Find a Handyman Near Me

From the Stockade Historic District in Schenectady to the brownstones of Albany’s Center Square and ranches in Colonie, Capital Region homes see it all: freeze-thaw cycles, nor’easters, high winds off the Hudson and Mohawk, sweltering summers, and leaf-choked gutters each fall. That mix can be brutal on your siding and exterior trim. If you’re seeing cracks, warping, peeling paint, or water stains, this guide will help you diagnose the problem, understand your options, and move forward confidently—whether you plan to patch a few pieces or pursue a full facelift.
Prefer expert help right away? If you’re searching for a handyman near me to assess or repair your exterior, you can get a fast, local response—and long-lasting results. For professional service and a free estimate, consider A&S Home Services (serving Albany, Schenectady, and surrounding communities).
Why Siding and Trim Matter for Capital Region Homes
Siding and exterior trim do more than define curb appeal. They shield your sheathing, framing, and interior finishes from water intrusion, wind, pests, and UV damage. When they fail, small gaps can become expensive structural repairs. Well-maintained siding and trim deliver:
- Weather protection: Stops wind-driven rain, snow, and ice from reaching the building envelope.
- Energy efficiency: Tight, sealed exteriors reduce drafts and help HVAC systems work less.
- Resale value: Crisp siding and trim signal a well-cared-for home to appraisers and buyers.
- Lower maintenance costs: Addressing issues early avoids sheathing rot, mold, and interior damage.
What Causes Exterior Siding or Trim Damage in Albany/Schenectady?
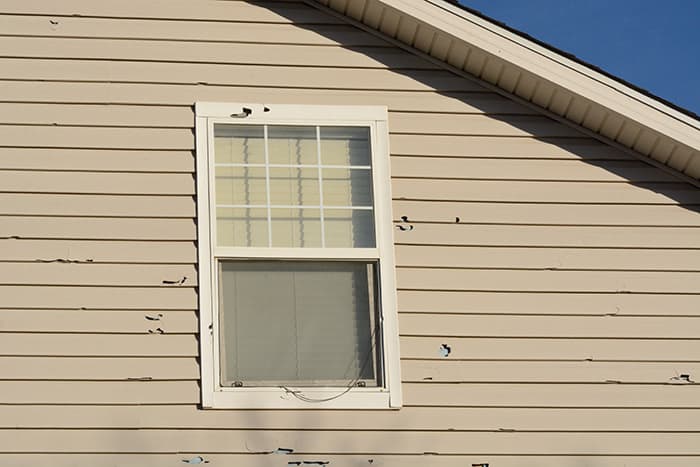
Upstate New York weather and site-specific factors drive most siding and trim issues. Here are the most common culprits—and how to spot them.
| Material | Common Issue | Likely Local Cause | Risk Level | Typical Repair Approach |
|---|---|---|---|---|
| Vinyl siding | Cracks, chips, or blow-offs | Wind gusts during nor’easters; impact from debris; brittle panels after winter cold | Medium | Replace damaged panels; re-nail/re-lock; add house wrap repairs if water reached sheathing |
| Vinyl siding | Warping or buckling | Improper nailing (no expansion room); heat from summer sun; dark paint on nearby trim | Medium | Rehang with proper fastener spacing; replace distorted sections |
| Wood clapboard/shingle | Rot and soft spots | Freeze-thaw moisture cycles; clogged gutters and splash-back; failed paint/caulk | High | Remove rot; scarf in new pieces; treat, prime, and repaint; improve drainage |
| Wood trim (fascia, window, corner) | Peeling paint, open joints | UV exposure; seasonal expansion; ice dams driving water behind fascia | Medium | Scrape, sand, epoxy-fill; replace sections; prime, caulk, and paint |
| Fiber-cement | Delamination or cracking at fasteners | Over-driven nails; wicking moisture along cut edges; improper clearances | Medium | Replace affected boards; seal cuts; correct flashing; repaint if needed |
| Aluminum siding | Dents and oxidation (chalky coating) | Hail and branch impacts; age-related oxidation from sun/snow cycles | Low–Medium | Pop minor dents; clean and repaint; replace badly damaged runs |
| Composite/PVC trim | Loose seams, pulled fasteners | Thermal movement; inadequate mechanical fastening; missing sealant | Low–Medium | Refasten with appropriate screws; add hidden fastening; re-caulk |
| Soffit/attic vents | Animal intrusion, moisture stains | Birds/squirrels; ice damming forcing meltwater into soffits | High | Repair/replace vents; add pest screens; improve attic ventilation; address ice dams |
How Do I Know My Home Needs Repair or Replacement?
Use this quick assessment to separate cosmetic annoyances from urgent problems.
| Sign | What It Means | Recommended Action | Urgency |
|---|---|---|---|
| Small cracks/chips in vinyl | Surface damage, potential water entry | Spot replace panels; inspect house wrap | Medium |
| Peeling paint on wood trim | Failed protection; water may be wicking in | Scrape/prime/paint; re-caulk joints | Medium |
| Soft or spongy trim/siding | Rot present; hidden damage likely | Open up and replace; treat; repaint | High |
| Warping/buckling runs | Improper install or moisture behind | Rehang or replace sections; evaluate flashing | High |
| Water stains on ceilings/walls near exterior | Potential siding/flashing leak | Trace and repair exterior; remediate interior | High |
| Mold/mildew odor | Longer-term moisture issue | Moisture testing; targeted removal; fix source | High |
| Frequent pest intrusion (wasps, squirrels) | Gaps at soffits, eaves, or trim seams | Seal openings; replace damaged vents/soffits | Medium–High |
Interior cracking or bubbling after an exterior leak? It may be time to evaluate your drywall as well. Here are 7 clear signs you need professional drywall repair services to help you decide.
If a storm just tore off panels or you’ve got active leakage, prioritize safety and immediate containment. See our guide to handyman emergency repair for what to do in the first 24–48 hours.
Steps in Siding and Trim Repair: What Pros Do
1) Inspection and Moisture Check
- Visual survey of all elevations, especially windward sides and areas under eaves.
- Probe wood trim for softness; check for fungal growth.
- Use moisture meter at suspect seams, window heads, and kick-out flashing areas.
- Document with photos and note underlying building paper/house wrap condition.
2) Scope and Materials Selection
- Define whether spot repairs, partial replacement, or full runs are best.
- Match materials and profiles (e.g., clapboard reveal, vinyl color/texture, PVC vs wood trim).
- Choose fasteners and sealants rated for exterior use and the substrate.
- Plan for flashing upgrades at critical transitions (roof-to-wall, deck ledger, window head).
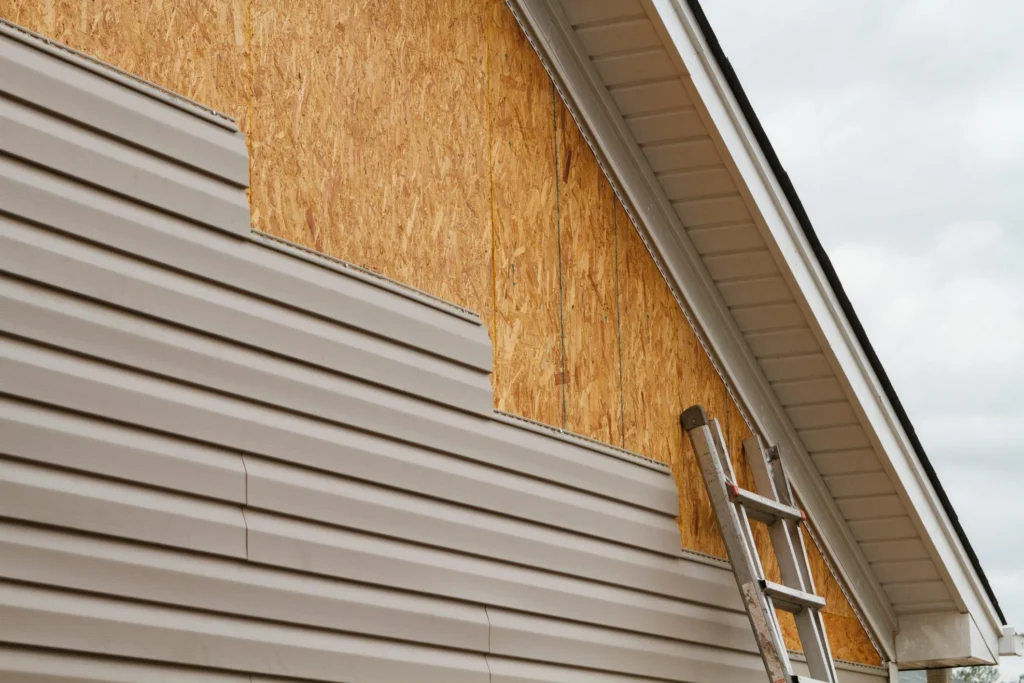
3) Protection and Demo
- Protect landscaping and walkways; set up ladders/scaffolding safely.
- Remove damaged panels/boards carefully to avoid collateral breakage.
- Open suspect areas far enough to confirm dry, sound sheathing/framing.
4) Substrate Repair
- Replace compromised sheathing; treat minor mold with appropriate biocide; dry-in the wall.
- Install house wrap or building paper with proper overlaps and tape.
- Add kick-out flashing and head flashing where missing or inadequate.
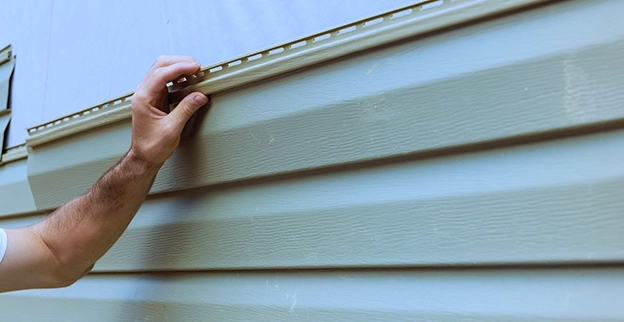
5) Reinstallation
- Install siding with manufacturer-specified clearances and nail placement to allow expansion.
- Use PVC or rot-resistant trim where appropriate; back-prime wood ends.
- Seal joints with high-quality exterior sealant; tool smooth; maintain weep paths.
6) Finishing and Quality Check
- Prime and paint new wood/fiber-cement; color-match as needed.
- Clean up debris and nails; walk the perimeter for missed gaps.
- Provide photo documentation and maintenance tips.
Visual Aid: Typical Repair Timeline & Material Pairings (Infographic – Descriptive)
Timeline Key: ■ = Half day
- Spot vinyl panel replacement (1–6 panels): ■ (0.5 day) to ■■ (1 day). Materials: Matching vinyl panels, corrosion-resistant nails, zip tool.
- Trim rot repair at one window or corner: ■■ (1 day) to ■■■ (1.5 days). Materials: PVC/wood trim, galvanized screws, primer/paint, sealant.
- Fiber-cement board replacement (1–2 courses): ■■ (1 day). Materials: Fiber-cement boards, SS nails, flashing, touch-up paint.
- Wind/hail damage on one elevation (10–20% area): ■■■■–■■■■■■ (2–3 days). Materials: Replacement siding, house wrap, flashing, fasteners.
- Sheathing repair behind leak area (open/replace/close): ■■■■–■■■■■■■ (2–4 days). Materials: OSB/plywood, house wrap, flashing, new siding/trim.
Cost Breakdown: DIY vs Hiring a Pro in Albany & Schenectady
Costs vary with materials, access, and extent of damage. The ranges below reflect typical local pricing for small to mid-size repair projects (not full re-siding).
| Project Type | DIY Materials & Tools | DIY Time | Pro/Handyman Cost | Notes |
|---|---|---|---|---|
| Replace 1–6 vinyl panels | $50–$180 (panels, nails, zip tool) | 2–6 hours | $200–$600 | Color match and proper locking are key to durability. |
| Repair rotted trim at one window/corner (4–12 ft) | $80–$250 (PVC/wood, screws, caulk, paint) | 4–10 hours | $350–$900 | Expect extra if hidden damage at joints is found. |
| Fiber-cement board replacement (1–2 courses) | $120–$300 (boards, SS nails, paint) | 6–10 hours | $450–$1,100 | Proper flashing and cut-edge sealing are critical. |
| Wind/hail damage on one elevation (10–20% area) | $200–$650 (mixed materials) | 1–2 days | $800–$2,500 | Height, access, and matching impact cost. |
| Leak area with sheathing repair (open/replace/close) | $250–$700 (sheathing, wrap, siding) | 2–3 days | $1,200–$3,200 | Includes moisture remediation and flashing upgrades. |
Comparative Graph: DIY vs Pro Cost Snapshot
Project                          DIY Est.         Pro Est.
Vinyl panel replacement          $$              $$
Trim rot (one opening)           $$             $$$
Fiber-cement (1–2 courses)       $$             $$$
Wind/hail (one elevation)        $$$            $$$$
Leak + sheathing repair          $$$           $$$$$

Legend: $ ~ $100
DIY may look cheaper on paper, but factor in tool purchases, time, risk of improper install, and potential rework. If you’re comparing both paths, you can also request a free estimate from a local pro to benchmark your numbers—especially if you’re already searching for a handyman near me.
Regional Trends: Weather-Related Wear and Seasonal Maintenance
- Freeze-thaw cycles (Nov–April): Water expands as it freezes, stressing joints and hairline cracks. Expect paint failures on wood trim and caulk splits around windows.
- Nor’easters and high winds: Wind-driven rain finds unflashed joints; vinyl panels can unlatch; aluminum dents.
- Ice dams: Heat loss at roof edges melts snow that refreezes at eaves, forcing water behind fascia/soffits and into walls.
- Summer UV and humidity: UV breaks down finishes; south and west elevations fade and chalk faster; humidity accelerates wood movement.
- Autumn leaves and gutters: Overflowing gutters soak siding and trim below, fueling rot and pest entry.
Seasonal Preventive Plan (Capital Region)
- Early Spring: Inspect all elevations after thaw; re-caulk and spot repaint; confirm splash blocks extend far from foundation.
- Late Spring: Power-wash gently (low pressure) to remove grime; treat mildew; touch-up paint. Verify kick-out flashing above roof-to-wall areas.
- Mid–Late Summer: Color matching and painting projects cure best; schedule trim/siding repairs now for pre-winter resilience.
- Fall: Clean gutters and downspouts; add gutter guards if trees are close; check attic ventilation to minimize ice dams.
- Pre-Winter: Secure loose panels; seal small gaps; plan emergency contact numbers for storms.
How to Choose the Right handyman near me in Schenectady & Albany
Selecting a skilled pro means fewer callbacks and longer-lasting repairs. Use this local-focused checklist to vet your options.
Must-Have Qualifications
- Local references and recent exterior projects: Ask for addresses in Schenectady, Albany, Guilderland, Niskayuna, or Colonie you can drive by.
- Photos of similar materials: Vinyl profile matching, fiber-cement details, rot repair before/after shots.
- Insurance: Liability and workers’ comp to protect you from jobsite risks.
- Detailed written scope: Includes materials, flashing approach, paint/finish plan, and warranty.
- Moisture-first mindset: Pros who probe, meter-test, and propose flashing/house wrap fixes—not just surface patches.
Questions to Ask
- How will you match my existing siding and color? If unavailable, what’s the plan to blend or transition?
- What’s your approach to flashing at windows, doors, deck ledgers, and roof-to-wall junctions?
- Will you open the wall if moisture readings are high? How far?
- What brand/type of sealant and fasteners do you use outdoors? Why?
- What’s your workmanship warranty and what does it cover?
Red Flags
- Quotes that skip moisture inspection or flashing upgrades in leak-prone areas.
- Cash-only bids without proof of insurance.
- Vague scopes: “replace as needed” with no line items or photos.
- Unrealistic timelines that don’t consider weather or dry time.
Simple Action Checklist (Visual)
5-Step Homeowner Plan
- [ ] Walk the exterior after rain; note stains, loose panels, soft spots.
- [ ] Photograph problem areas straight-on and at angles; include a tape measure for scale.
- [ ] Check gutters/downs for clogs; confirm water discharges 4–6 feet from the foundation.
- [ ] List materials you have (vinyl brand/color, wood species, fiber-cement type) if known.
- [ ] Get two estimates with written scopes—ask each pro to explain moisture and flashing steps.
Can I Repair It Myself—or Should I Hire a Professional?
DIY fits small, accessible fixes where you can match materials perfectly, such as a few vinyl panels at ground level or repainting sound wood trim. You’ll need comfort with ladders, saws, and precise measuring. Hire a pro when:
- Damage involves leaks, rot, or suspected sheathing issues.
- Repairs occur at height or over complex flashing zones (roof-to-wall, around decks).
- You have fiber-cement or historic profiles needing specialized tools and techniques.
- Time is critical (e.g., upcoming storm) or you need warranty-backed work.
If you’re leaning toward pro help, you’re likely already comparing quotes from a handyman near me. Use the vetting checklist above to pick the best fit.
Materials at a Glance: What Lasts Longest Here?
- Vinyl: Cost-effective, low maintenance; can crack in extreme cold; color-matching matters.
- Fiber-cement: Excellent durability and paint adhesion; heavier to work with; needs proper flashing and edge sealing.
- Wood: Classic look; highest maintenance; benefits from PVC replacements at splash zones.
- Aluminum: Durable but dent-prone; often repainted to refresh appearance.
- PVC/composite trim: Rot-proof; great for fascia, rakes, and splash-back corners.
Repair Timelines by Project Size (Infographic – Descriptive)
Small (Half-Day to 1 Day): Swap 1–6 vinyl panels; re-caulk and repaint one window; resecure loose soffit.
Medium (1–3 Days): Replace damaged trim on two elevations; repair wind damage on one wall; replace 1–2 courses of fiber-cement with repaint.
Large (3–5+ Days): Investigate and repair leak with sheathing replacement; re-side a full elevation; multi-opening trim overhaul with fascia/soffit improvements.
Project Prep: What to Do Before Your Crew Arrives
- Clear 3–5 feet around work areas; move grills, furniture, and vehicles.
- Trim shrubs away from walls where possible.
- Discuss pet containment and gate/driveway access with the crew lead.
- Confirm color/finish selections and any special-order materials ahead of time.
- Plan around weather: allow dry windows for painting and caulking cure times.
FAQs: Siding & Exterior Trim Repair
How much does siding/trim repair cost near Albany and Schenectady?
Small repairs (a few vinyl panels or a single trim corner) often land between $200 and $900. Complex areas with sheathing repairs typically range from $1,200 to $3,200. Full-home re-siding is a different category entirely and depends on material choice and home size.
How long do repairs last?
Properly executed repairs with the right materials should last many years. Vinyl panel replacements can last 15–25 years; fiber-cement repairs can match the life of the rest of the cladding; PVC trim is essentially rot-proof. Paint and caulk typically need renewal every 5–10 years depending on exposure.
Can I just paint over damaged wood trim?
Painting over soft or rotted wood won’t stop decay. You must remove or consolidate rot, replace damaged sections, and then prime and paint. Paint is a protective finish—not a structural fix.
Will repairs void my siding warranty?
Not if they follow manufacturer guidelines. Issues arise when installers over-drive nails, skip required clearances, or ignore flashing requirements. Always ask your pro how their method complies with your brand’s specs.
How quickly can a repair be scheduled?
Small repairs can often be scheduled within a few business days during the shoulder seasons. After major storms, book quickly—local calendars fill fast. Emergency tarping and temporary dry-in can mitigate damage while you await permanent repair.
Is DIY safe for second-story work?
Only if you have appropriate ladders, fall protection, and experience. Many homeowners choose a pro for second-story or steep grade work to avoid risk.
What’s the best trim material for wet corners or near-grade areas?
PVC or fiber-cement trim outlasts wood where splash-back or snow piles up. If you love the look of wood, use it above splash zones and prime all sides thoroughly.
What about interior damage after an exterior leak?
Once the exterior source is repaired, address interior drywall and insulation promptly to prevent mold. If you’re unsure whether wall damage warrants attention, review these 7 clear signs you need professional drywall repair services.
Putting It All Together: A Smart, Local Plan
- Inspect your exterior after heavy weather and at the start of each season.
- Document issues with photos; note elevations and measurements.
- Decide DIY vs pro based on scope, access, and comfort with moisture diagnostics.
- Get two written estimates and compare flashing and moisture management details—not just price.
- Schedule work during favorable weather windows for best results.
Conclusion: Protect Your Home and Restore Curb Appeal
In our Capital Region climate, exterior siding and trim take a beating. The good news: thoughtful repairs—done with the right materials, flashing, and finishes—can stop leaks, prevent rot, and refresh your home’s appearance for years. Whether you tackle a small panel swap yourself or bring in a trusted pro, the steps in this guide will help you plan, budget, and choose wisely.
If you’re ready to compare options, start with a fast, local estimate from a reputable team. You can explore your choices with a handyman near me, ask about moisture testing, and lock in a timeline that fits your schedule. For friendly, experienced help in Albany, Schenectady, and nearby towns, reach out to A&S Home Services to get started today.